Artist Tips: Deetron
Inspired production knowledge from a celebrated Swiss artist.

Artist Tips: Deetron
Inspired production knowledge from a celebrated Swiss artist.
Swiss DJ and producer Sam Geiser’s technical proficiency should not be understated. As Deetron, Geiser has operated in the upper echelons of house and techno since the mid-’90s, delivering world-class, highly-acclaimed outings for coveted mix series (fabric, Balance, and DJ-Kicks), as well as two albums on Music Man Records and countless EPs and remixes on imprints such as Aus Music, Circus Company, Rejected, and the aforementioned Music Man. Geiser takes to each of these artistic endeavors with meticulous fervor, from his notorious three-deck mixing wizardry to his tough yet accessible productions. Geiser is one of the most consistent artists in the game.
Geiser’s latest outing as Deetron found him mixing the first 2018 edition of !K7‘s renowned DJ-Kicks series. Released back in March, the 38-track mix is the latest manifestation of Geiser’s gracefull mixing style and refined production aesthetic, crafting a body of work that, as he says, “represents my work as a producer and remixer as well as my aim to recreate tracks using three decks when DJing.” Under Geiser’s deft touch, the mix CD format comfortably leans more towards that of an artist album, massaging tracks together into new forms while approaching sections “more like a production or remix,” he states. It’s an emotive and engrossing compilation from an artist who has been blurring the boundaries of DJing and production for over two decades.
For our latest Artist Tips, we enlisted Geiser to offer a range of production knowledge, from recording synths into Ableton for in-the-box processing to morphing vocals into basslines and more.
Deetron “Untitled” (DJ-Kicks exclusive)
Use Analog and Digital Synths in the Creative Process
I have set up all my synths in such a way that they run through my soundcard and into Ableton so I can put effects plugins over them and, finally, export them for my mixdowns. If you have a similar setup, here are a few tips on how to get going with making a new track.
Firstly, get together a basic rhythmic structure to play with and then start recording long takes using your master MIDI keyboard or recording audio directly with any synths you may not have hooked up with MIDI. After you have recorded a few takes, playback the MIDI or audio files and try to look for the best parts. Based upon these first recordings—which could be, for example, a chord progression, bassline, or lead—start building the track and arrangement. This process gives you more of a live feeling and allows for an instant and spontaneous approach to making music, which is important in my opinion, especially at the start of the creation of new music. Very often the initial idea transforms into something entirely different, harmony-wise but also rhythmically and I find that’s an exciting side to the process as well.
Use Plug-ins and Layers to Enrich Your Synth Sounds
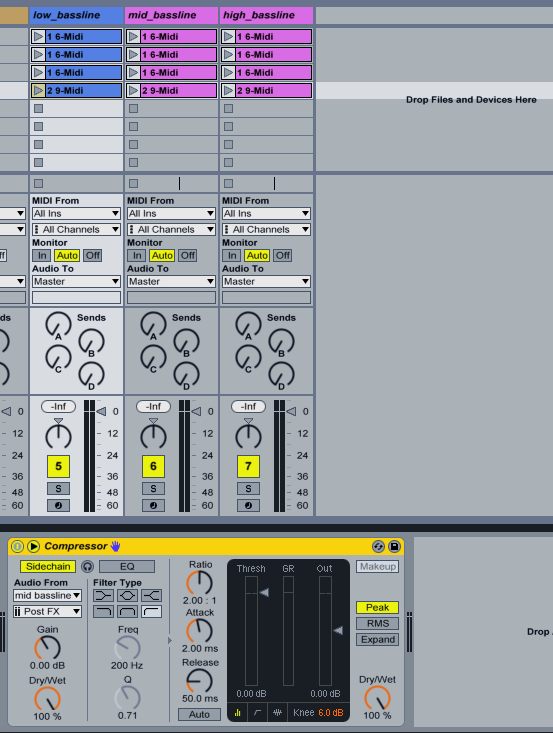
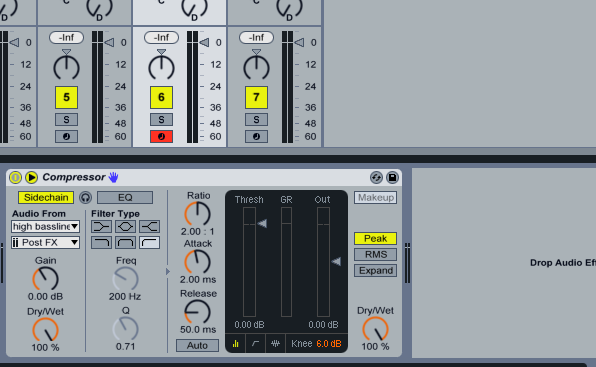
As mentioned in the above tip, the advantage of running the audio of the synths through the computer is the possibility of adding a plethora of plugins to the sounds. For example, you could use big hall reverbs such as R-Verb or Trueverb with low decays on basslines in order to give the sound more space and depth. I should also mention that the bass section, in general, is what I consider the most important in my music and it takes up most of my time spent in the final mixdown. In order to get a larger sounding bass section, layer multiple sounds playing the same bassline pattern. You can achieve the best results if you have a sound covering the sub-bass section below 100 Hz, another one covering frequencies around and just above 100 Hz, as well as a line covering the lower mids around the 250 Hz. In this case of three separate basslines, to get them to sound coherent and punchy together, use sidechain compression on the three elements feeding into each other. In order to do that, put a compressor on each of the two lower frequency basslines and sidechain the higher freq one into the compressor on the sub-bass and the highest frequency bassline into the compressor on the mid-frequency bassline, as seen below.

Work with Vocals or Other Samples to Build Sounds
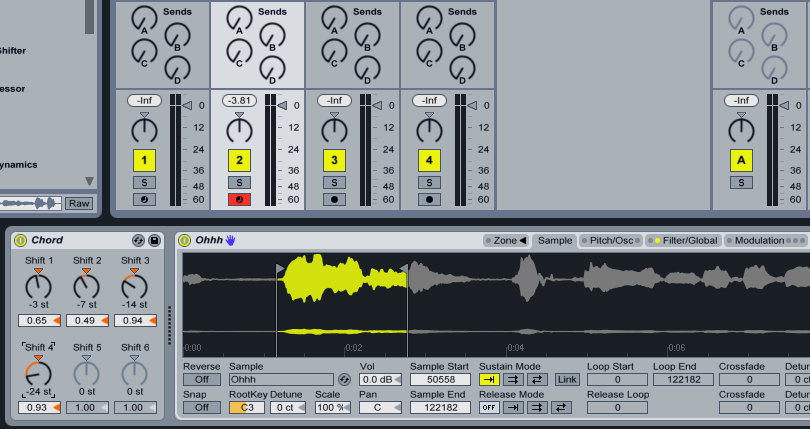
A technique I love to use to create pads or deep bassline sounds is to take vocal samples, or sometimes I also my own voice, and manipulate these in a way that they become a sound of their own. In order to do this, layer a simple “ooh” or “aah” across a certain spectrum, for instance, the circle of fifths across a few octaves—I often use the chord function in Ableton to do this. Following that, heavily process the samples with EQ’s, filters, reverbs, and distortion to your liking and thus create your own sounds to work with on the track. At the end of the day, it’s a lot like building a sound with a synth but I find it inspiring to use a sample that might seem unlikely to make a certain sound. My track called “Sing” and my remix for Tony Lionni have almost entirely been made using this approach and one of my personal favorites, the remix I made for Ezel’s “In my lifetime,” is also based upon this technique. Both tracks are making use of a choir-like sound I put into Ableton’s Sampler to transform into the bassline and main lead lines in both tracks.
Record Effects on Percussion
In order to give the rhythm section of my tracks more depth and atmosphere, I like to put effects on my percussive elements in the mix. For example, take a shaker and map it to a number of effects channels—for instance, a flanger, reverb, or delay—and then mute the original percussion channel and keep the effects channels playing solo. Quite often during the process of doing so, a percussive element can develop a life of its own and become more of a melodic element in the track. There’s a lot of trial and error involved in this, so the more you tweak and override your effects the better. I also like putting reverbs on my bass drums and then recording them solo on a separate channel, before sampling them as individual sounds with Ableton’s Sampler or Impulse and layering the new sound with the kick drum with the help of sidechain compression.
Double Vocal Channels for a Richer Sound
A simple but effective trick you can apply when working with vocal stems is to duplicate the original channel—which immediately enriches the sound and body of the original vocal parts—then slightly re-time it so it works almost like a very short delay. You can then pan both of them left and right in order to give the vocal more width and spectrum. The next step is usually adding effects to the duplicate channel like, for example, adding a harmonic doubler effect or some distortion. This very much depends on how you would like the vocal to sound—more earthy and clean or possibly more robotic and processed, for example. Furthermore, you could use the same approach described in the paragraph above and place an effects chain on one of the channels and record it solo as a separate channel and layer with the original sound.

