Download an Ableton Live Set and Note Set From Aril Brikha
Learn about the process behind '90s hit “Groove La Chord” and how it was recreated using Live and Note.
Download an Ableton Live Set and Note Set From Aril Brikha
Learn about the process behind '90s hit “Groove La Chord” and how it was recreated using Live and Note.
What is the formula for making a hit record? Is it a balance of talent, inspiration, and years of practice? Or is the process simply a matter of luck, or perhaps even the result of some higher powers at work? Romantic poets such as Coleridge and Shelley believed that in order to receive artistic visions, the soul had to be attuned to divine or mystical “winds.” The ancient Greeks believed that unconscious bursts of creative genius came from Muses—the goddesses of literature, science, and the arts. Whatever the truth is, it’s clear there is no definitive answer to this age-old question.
So what if we instead tried to recreate a record that was already a hit? If we endeavor to do exactly what was done before, would the results be the same? Can we capture lightning in a bottle twice? We asked Aril Brikha if he wanted to give it a try. The Iranian-born producer does, after all, know a thing or two about making hits. He’s the man behind one of Detroit Techno’s most iconic anthems—”Groove La Chord.”
In partnership with Ableton, we interviewed Brikha about the making of “Groove La Chord” and his experience recreating it—this time using Live and Note. Plus, he has shared a download of his Live Set and Note Set for a direct look into his process.
Download the Live Set to Aril Brikha’s remake of “Groove La Chord” here*
*Requires a Live 11 Suite license or the free trial.
Download the Note Set to Aril Brikha’s remake of “Groove La Chord” here*
*Requires Note, on an iOS device running iOS 15 or higher. Alternatively, you can open the Note Set with Live 11 Suite or the free trial.
Please be advised: This Live Set and Note Set and included samples are for educational use only and cannot be used for commercial purposes.
Thanks for taking on this challenge, Aril. Before we dive in, can you tell us how you first got into music-making?
My father was really interested in music. He gave me a keyboard when I was seven years old. Well, I think he actually got the keyboard for himself but it was meant to be for me! By my early teens, I was mainly listening to ‘80s pop music on MTV. But it was always the electronic music that I liked. “Behind the Wheel” by Depeche Mode was the first track I clearly remember where there was a prominent kick drum.
Growing up in a small city called Jönköping outside of Stockholm I didn’t really have other people to bounce ideas off and learn from. There was no internet back then, and hardly any magazines so I just learned to make music on my own. But I did have a few friends that were regularly buying records. Eventually, they pointed out that the music I was creating was called Detroit Techno.
So you were making Detroit Techno before you’d even heard of it?
I definitely wouldn’t have heard of it because, in Jönköping, we just had a state-owned radio channel called P3, which would only sometimes play club music. So in those early days, I was referencing the melancholic vibes and melodics of Depeche Mode and the energy of Nitzer Ebb and Kraftwerk. I don’t have an exact timeline. I’m not going to say I invented Detroit Techno. There was a lot of EBM around then. And I would still say EBM was very much the early days of techno, without the melodic aspect. This was what I was trying to recreate. I didn’t DJ, I didn’t collect records or sample them. I came from the background of just having a sequencer and gear and trying to make something with those machines.
What synths and drum machines did you first lay your hands on back then?
The first synth I had was the Ensoniq SQ80. I was trying to learn how to program it before knowing anything about electronic music, really. I was just trying to recreate what I thought I might have heard on records or at parties. I seemed to be gravitating more toward the minimal sounds of artists like Robert Hood or Basic Channel. The SQ80 wasn’t really a hands-on synth like a Roland Juno. You really needed to dive into menus. When I told people what synth I was using, they would go out and buy it. But they would throw it away after a week and say, “how do you make any sense of the menus?.” But that was the beauty of learning how to program a synth which seems to be impossible to learn. Through either faith or destiny, I ended up with it. I think Adamski might be the most famous person who used the Ensoniq SQ80. I remember hearing “Killer” and I thought “wait a minute! I know those stabs”.
Along with the SQ80, I had a Roland R8 digital drum machine, which had 808 and 909 kits. And at some point in the mid-nineties, I saw an ad from a guy who was selling a Roland System 100, a Roland 808, 303, and a Yamaha CS-5, along with an electric guitar. And I got all of that for $400. This was at the end of those days when you could still manage to hit the jackpot like that, and I definitely did.
“Groove La Chord was all recorded live. If I had not pressed record on my DAT machine that day it wouldn’t exist.”
What was your first record release?
My first release was on a label from my hometown called PTS. Later, I tried to get my music released on Swedish labels like Svek. And I sent demos to F Communications and Soma. None of them wanted them. So as a last resort I thought fuck it, I’m just going to send the demos to Detroit where this music is meant to be. 430 West and Transmat both got back to me within three days, which was shocking after three years of trying to release my music in Europe. The first release came out on Fragile; a subsidiary of Transmat. It was called Art of Vengence EP and featured “Groove La Chord”.
Did the subsequent success of “Groove La Chord” surprise you?
I had no clue. It wasn’t like “I know this track, once it finds its way home people will understand.” I didn’t even believe in the track. So when the label got back to me and said it was the one they wanted I was very surprised. I thought they didn’t know what they were talking about. But, I let them choose the A-side and I chose the B-side. Nobody remembers the B-side of course. They all remember the A-side.
What was the B-side, sorry?
Haha, exactly! It was called “Way Back.” It really felt like the sound I had aspired to achieve then. It was a repetitive track, like “Groove La Chord,” but “Groove La Chord” was, to my mind, like a silly, simple coincidence. “Groove La Chord” was all recorded live. If I had not pressed record on my DAT machine that day it wouldn’t exist. It’s just a miracle that it even made it on a demo. I couldn’t hear its commercial potential then and that clearly says everything about me as a DJ or an A&R person. So I said to the label, “yeah cool, you chose the A-side, I will choose the B-side and we will see which one is going to be the hit.” They were right.
In hindsight, what do you think it was about “Groove La Chord” that made it so successful?
It’s the complete simplicity of it. It’s so stripped down. Everything you hear was made on a Roland R8 drum machine. The beats and the bassline. The chord is the only thing coming from the Ensoniq SQ8. I felt almost like I was cheating. It’s the same way I felt when recreating this track recently in Live and Note. It’s so simple that I would never in my life just settle with something like this. And I think this was my problem before and after this track. I’ve always overworked my music or added too much. I’m sure everyone making music knows how that is. I think it’s just having the courage and ear to know when you don’t need anything else—this is all that this track needs. “Groove La Chord” literally just builds on tension by opening the filter and closing it, as well as adding the ride, and removing it. It’s these very basic tricks that maintain its momentum. If I would have just one bar of it playing on repeat, it would be so boring. It’s the tactical part of actually playing the track in real time that makes it sound interesting.
How do you think “Groove La Chord” complimented other records being released at that time?
“Groove La Chord” was a crossover hit at a time when everything was either like New York house or techno. I wasn’t trying to bridge a gap. I’ve loved house music and I’ve loved techno and everything in between. But I realized house DJs were playing “Groove La Chord” pitched down and techno DJs were playing it at its original pitch. In Detroit, there’s this genre called ghettotech, and they were playing “Groove La Chord” at 45 rpm! So somehow everybody was playing this track. It took over a year for me to realize this, until I read some reviews. Back then this was the amount of time it would take for a magazine to pick up a single and then review it. And then more people would buy the track.
So I think the simplicity was the winning concept and perhaps the crossover of genres. François K and other artists were playing it back-to-back on vinyl. I heard they would have two copies of it and would just keep playing it for half an hour. And with recent DJs as well, I hear them play the track and add other things on. It works really well with other tracks. It’s like a tool.
“I didn’t care, I pushed everything into the red.“
How did you record the parts in “Groove La Chord” back then?
In the studio, there was no DAW, and there was no way to recall a mix. It was all about capturing the vibe in the moment. Especially if you don’t make any arrangements. I did not back then and I still don’t work in a linear way today. I always work in Live’s session view. The setup back then was simple. It was my Fostex 812 mixing desk, an Alesis QudraVerb, and a Yamaha R100 delay. The Roland R8 had a group of sounds going into one channel on the mixer. In this case, it was the 808 kick tuned down along with a clap and the ride. And this channel was super saturated so once I bought in the ride everything was crunchy and nice.
Were you achieving that saturation simply by overdriving the channels on your mixer?
Exactly. And I would overdrive signals into the delay unit just to give it a certain texture. I basically didn’t look so much, I just tweaked things by ear until I found an interesting sound. I remember Jesper Dahlbäck passing by one day and seeing everything on my mixer running in the red. He said, “you can’t work like this”, and I said, “but it sounds good.” “Yeah, but you shouldn’t do that,” he said. I didn’t care, I pushed everything into the red.
You mentioned building tension on the chord by opening and closing the filter. What other parameters did you tweak in real-time to keep the track interesting?
I’m very much into sweeping the mids on the EQ. I would manipulate them to create movement in the chord. I got the Fostex 812 mixer specifically because it has sweepable mids. I also filtered out the kick’s sub-frequencies for a while. I think it takes two or three minutes into the track before the sub of the kick actually drops. And it was on purpose that I kept it like that. It sounds good being mixed in, and then three minutes later it just goes boom. And in a club, it’s just crazy to see that actually happen. Back in the days when nothing was super well mastered or really loud, it really made an impact.
How many takes did you need to record before you were happy with the track?
I think I recorded two or three takes. But it’s the first one that I kept. No edits and no post-production. It’s just recorded straight onto DAT. I thought maybe I should give it another go to make it tighter. Because I could hear I wasn’t dropping the ride or tweaking the filters after specific bars or intervals. When you actually listen to the record and count things in, none of it makes sense. So I tried to re-record it. But nothing came close to the energy of that first take. It’s a giant fluke really that this thing even came to the point where I would waste ten minutes on a DAT to record it. But it’s the luckiest ten minutes I’ve wasted.
After the success of Groove La Chord, you also started to tour and perform the track live, right?
Yes. So basically, Transmat asked me to join them on an American tour and a European tour. I ended up buying an Akai MPC 2000 and put all of the drum sounds from the Roland R8 into it. The Ensoniq SQ80 came with me, and I just played it the same way as I played it at home. And from the MPC I eventually moved to Ableton Live, before it supported MIDI. So I recorded everything from my hardware. Thankfully “Groove La Chord” is arguably the most well-known track I’ve made, so most people recognize it when I play it out. After playing it for 25 years of course I try to do different versions of it. I slow it down, I do mashups of it. But to actually play it back the same way as the original is very hard. And I felt the same way recreating it recently with Live and Note. When I’m limiting myself to those same three channels it’s quite hard to make it sound interesting for more than two minutes. You have to keep creating small little changes to the sound, or at least I do, so I don’t get tired of just hearing the same chord over a beat.
When you’re playing live on stage what’s your setup?
For years now it’s been a strictly Ableton Live setup. I also have a Roland TR8, a Livid Code controller, and a Launch Pad. That’s pretty much it. Within Live, I don’t launch any kind of arrangement. Each song is one Scene in the Session View. Everything is separated: the kick drum, hi-hats, bassline, percussion, and chords. I’ll have two or three VST channels open for certain tracks. I don’t use recordings of the VST instruments. As much as I can, I try to perform in the same way the tracks were originally made.
I think half the people that see me perform don’t even realize that I play live vs DJing. And I still insist on having no pre-made arrangements or build-ups. There are no Scenes where I cheat or make life easier for myself. Sometimes I mess up—if the whiskey is too good. Sometimes the whiskey is so good that I play the best set ever.
How easy or difficult was it to recapture the sound of the hardware you used on the original “Groove La Chord” when remaking it with devices in Live?
It was in some ways difficult and in other ways actually quite easy. The 909 and 808 kits on the Roland R8 drum machine didn’t sound completely authentic. And I was gutted back in the ‘90s after I bought it. But I think somehow in the end it played in my favor. You could manipulate the drum sounds not only by detuning but also by dialing in the different nuances and character settings. I didn’t try to re-create that in Live. I just used the classic 808 and 909 kits that are included with the software. They sound more like real 909s and 808s than the R8 did.
The first thing I did in Live was basically the same thing I did when I created the original. I just played in the 808 kick and clap. There’s not much EQing. Most sound shaping is happening in the Saturator device. Of course, the Saturator is not going to sound the same way as my old Fostex mixer is going to sound. So instead, I just tried making it as good as I could with what I had, rather than trying to do a complete clone of the original. I pushed the Saturator’s drive to get those overtones and create a similar effect. I also decided to group the channels in Live to mimic the main outputs of the R8. Originally the kick drum came out of the main left and right outputs of the R8. Everything else came on another output and got the same distortion and saturation because it was gained on the Fostex mixer.
On the original, I also had a cheap Behringer compressor on the master. I barely knew what a compressor was or did then, but everybody had one. I’d heard that Daft Punk had them, all the top techno guys had them, and you needed them for that pumping sound. So, fine I thought. I bought one, and I put it on the master. A sound engineer would probably be laughing or telling me it was an insane setting, but I just tweaked it to the point where everything glued. In general, in a DAW I’m having a hard time getting things to glue. With the Behringer compressor on my master, I could just push everything to where it hit this sweet spot. That’s what gives this tension between the sounds.
When the 808 bass kicks in the 909 rides seem to duck in volume. Is there some kind of sidechaining process going on?
Nope, this is exactly what I was talking about with the whole gluing thing. And it’s purely because the ride is fighting for its space with the bass. Because it’s all going into one Group channel with saturation. This is what creates the ducking. There was nothing in the original or in this project that is being side-chained.
How did you recreate the infamous chord in Live?
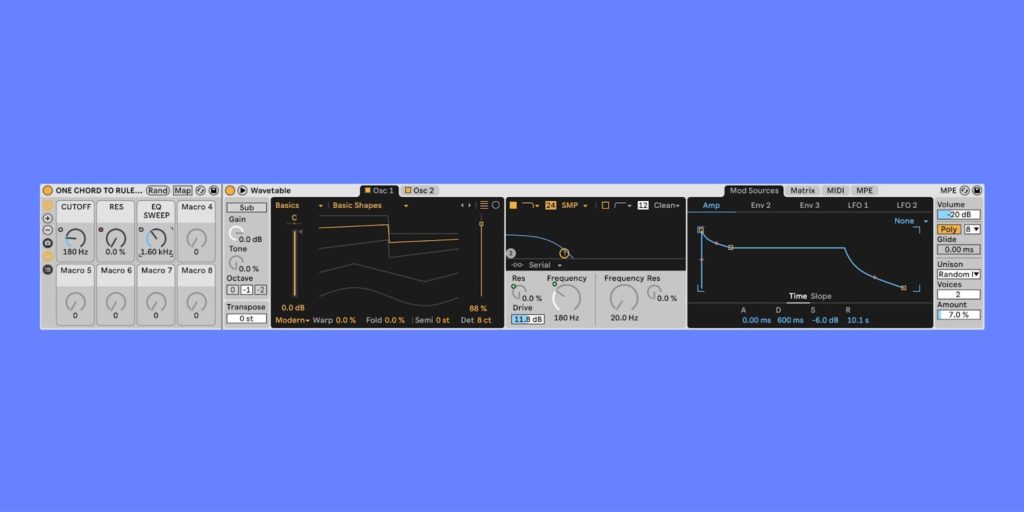
I used Live’s Wavetable synth to remake the chord. If you look at Wavetable, Oscillator 2 is detuned by seven semi-tones, which means it’s not just a minor chord, it’s something with a seventh. It’s exactly the same way that I did it in the Ensoniq SQ80. I had no music theory background then, it was just a case of experimenting. The SQ80 was not the easiest or most logical synth to learn, but it taught me the importance of knowing what your synth sounds like. I could tweak it in my sleep now. I know exactly where to go to achieve something.
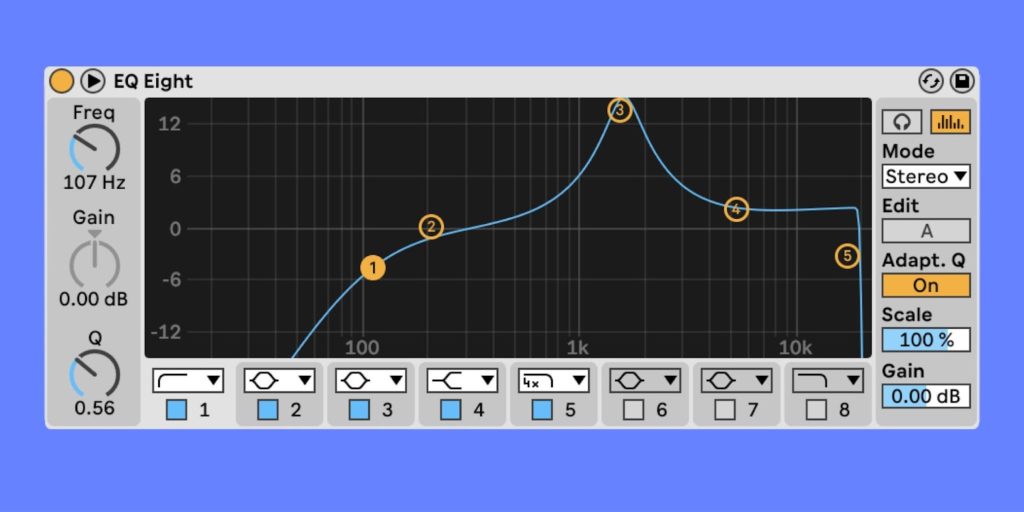
If you go into my Live Set and look at my chords, I’ve also set up EQ Eight so that I can sweep my mids. I usually crank up filter number three on the EQ Eight and map it to a Macro. Then I can just sweep the frequency and create these dub chords. It’s all in the sweepable mids.
Recently I also managed to re-record the chord pattern on SQ80. I’ve included it in the Live Set so that you can hear the difference.
In Live, the chord sounds like it’s routed to a filter envelope because the notes get shorter when the filter is closed. Can you walk us through what’s happening here?
The envelope and the filter play a key role in the shaping of this sound. Actually, I would still like to tweak the filter envelope and how it reacts; to try and get even closer to the original. I’m 85% happy with the way it turned out. When you only have two hands and you’re meant to play everything live, you don’t want to be changing lots of things. So I don’t play with the decay or release settings of the envelope in real time. I would literally only be opening the filter cut-off and adding resonance. To achieve that I need an envelope that makes the chord sound exactly the way I want it when cut off and fully closed. I couldn’t replicate this exactly in Live. But the beauty with Live is that I can limit the minimum value of the cut off frequency on a Macro. This helps a lot.
You can hear the movement on the envelope and how it rolls on the original when the filter opens. There’s also an after-release on the chord which affected the filter. And when you opened the filter you got a very sharp attack. So it’s all these little things that make the sound.
Did you use a controller to record all your automation in Live?
Yes. In this case, it was an Alesis keyboard with eight pads, sliders, and knobs. In Live, I assigned the sliders to the volume on the three channels as if it were a mixing desk. So I could just fade up the beats.
What effect is the Auto Pan device having on your chord track?
The Auto Pan is there to recreate some of that movement, so your ears don’t get tired of hearing the same chord played over and over again. On the Ensoniq SQ8, I would put an LFO on the amp to create this kind of width and movement.
What effect is the Phaser device having on the Reverb return track?
I was trying to recreate the Alesis QuadraVerb effects from the original. If you listen to the original intro you can hear them clearly. It’s on both the bass and clap group and on the chord. This was to give it that movement once again. It was the QuadraVerb that gave the sounds a shifting slow modulation. I think originally it was a reverb, chorus, and some kind of phaser or flanger. To recreate this I used Live’s Phaser on the return track with the Acoustic Cascade preset.
Let’s look at the version of “Groove La Chord” you recreated in Note. How did you find the process of programming the beats with the app?
In Note, I set the metronome slightly slower because 133 BPM—which was the original speed—was a bit too fast for me to play the beats in with my iPhone. And again, where possible, I tried to replicate the process of making the original. That being said, I just punched in the bassline, the 808 kit, and clap, and built it up the same way.
Why have you added a delay to your 808 Kit FX in Note?
Because the delay also gives the kick drum that modulation and rhythmic groove. On the original, I would have used the Yamaha R100 delay. But in Note, this delay, in particular, was me just trying to use the app as it was intended—as a sketching tool to either achieve an idea that you have or, in this case, recreate a 25-year-old idea. It was just about finding a rhythm. I know how the original kick drum pattern is played. If you remove the dry/wet it has no groove. It’s about finding the balance between how much delay you add to create enough rhythm without taking away the substance and the punch.
What drew you to using the Mellow Tine Keys preset for your chord sound in Note?
I wanted a synth preset that had either a five or a seven-semitone detuned oscillator. The filter envelope on the preset doesn’t have the same Macros that I would have used in Live, but by tweaking the decay and release settings I got a similar effect.
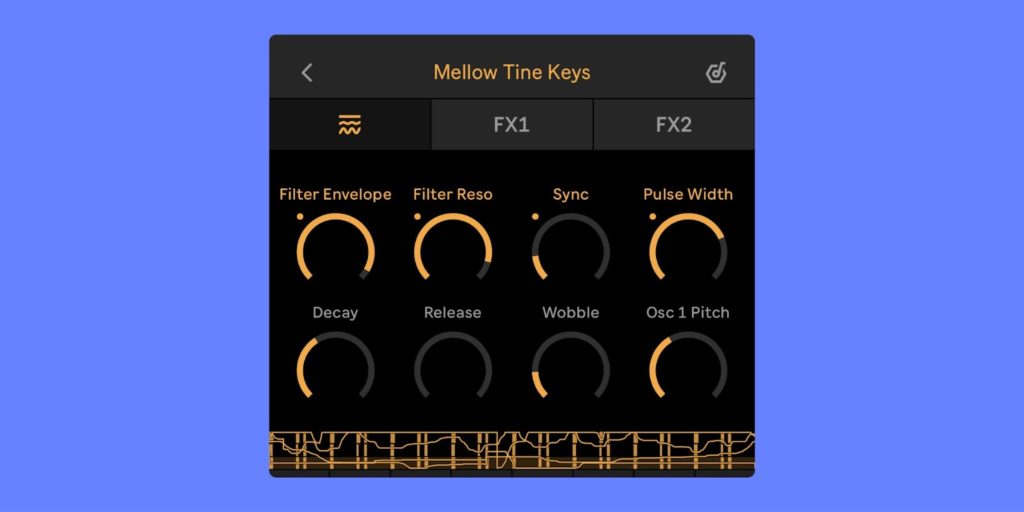
How did you find using Note’s Flanger effect on your chord?
As before, I was trying to find the right balance between the speed of the Flanger’s modulation and the balance of dry/wet. In a mixing desk situation, I would have had my effects units on 100% wet, using sends, that was always the way. I guess I’m used to the old dub way of mixing.
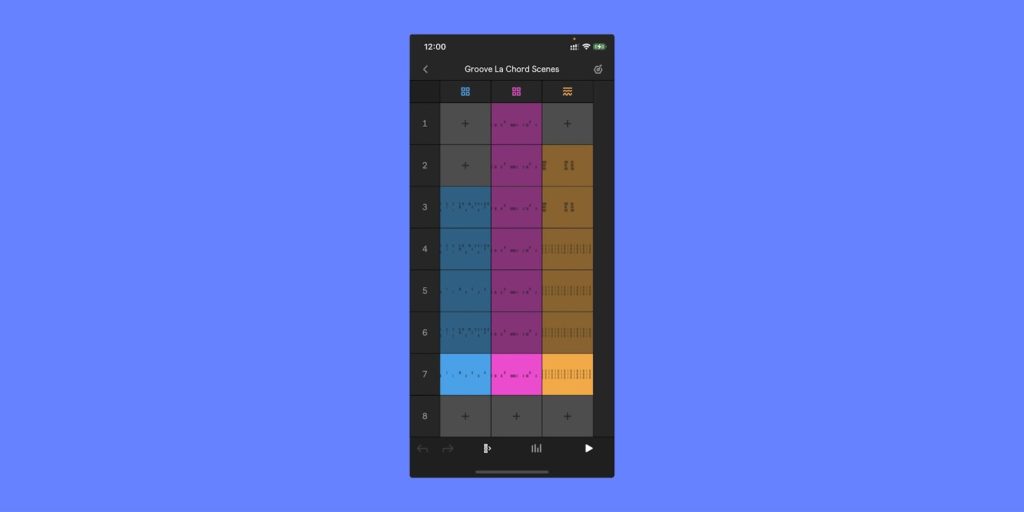
In Note, you have different Scenes with slightly different Clips on your chord track. What’s happening there?
In the first Scene, the Clip doesn’t have any automation. But in the second Scene, I recorded automation where the chord opens up. I’m going to create another Scene later where the pulse width is going to move up and down slowly; as if I would be tweaking the sweepable mids. I will create more Scenes as if they were in Live’s Session View. Scene one will be the intro with just the kick. The 808 and the chords will get introduced in Scene two. In Scene three everything will play. Then, in the following Scenes, the filter will be opened and then closed.
Aril, thanks so much for sharing the amazing story of “Groove La Chord”. What’s on the horizon for you in 2023?
After opening a restaurant right before the pandemic and having recently left it, I’m just looking forward to getting back into my studio and making music again. I’ve not released anything since my last two albums Dance of a Trillion Stars and Prisma. They came out on Mulemusiq in 2020. But they were released into a pandemic void and lost in space.
I rarely make music these days. I personally have to be in a place where I do it without any pressure or intention. The older I get, one would assume that the knowledge and the years of practice would have made things easier. But I feel it’s just placed more barriers in the shape of “you can’t do this or you should do that.” So my aim in the future is to once again find the pleasure of just making noise for myself with no expectation of what the outcome might be. That’s basically what I did as a teenager when I had no clue what I was doing. That’s how I made “Groove La Chord,”, in my bedroom, on my headphones, just for me.
Text and interview by Joseph Joyce.

