Africa Hitech’s iPhone Production Tips
It’s doubtful that when Mark Pritchard and Steve Spacek named their new collaboration Africa Hitech, […]

It’s doubtful that when Mark Pritchard and Steve Spacek named their new collaboration Africa Hitech, their production techniques were in some way trying to approximate African technology. Case in point: One of the commonly used pieces of gear on their new record, 93 Million Miles, is actually an iPhone program called iSyn. So we had Spacek tell us a bit about the process, and which other iPhone-compatible software is out there:
Make sure you have either a good pair of headphones, or a mini-jack-to-phono-lead so you can connect to a decent soundsystem or studio set-up. A lot of these music apps may initially come across as toys. But be warned, a handful of the really good ones can kick out some serious sound, and can easily cover all those fat frequencies so prevalent in modern production. In particular, with iSyn, be wary of your listening level, especially when using headphones, as you will find that the bass along with some of the other frequencies can really kick out and damage those precious ears!
You can grab the apps via iTunes, or directly via your iPhone/iPod. If you can, try it before you buy it. Some apps come as a paired-down version—usually when they are launched—for free or at a greatly reduced price. I go for a certain look. It sounds shallow, but if I don’t like the look of a piece of gear, then I find it less inspirational to use—the exception being iSyn. I never liked the look of this amazing piece of tech in the beginning. Suffice to say, the looks have grown on me and it is now officially my first stop when I feel inspired to knock up a little something for the floor! Other great apps to check are Nano Studio, BeatMaker2, Akai SynthStation, and FunkBox, which is an emulation of seven of the greatest drum machines from the past: 808, 909, 606, CR-78, mainly Roland. Plus, you can export your beats across to your main computer, along with the MIDI files too.
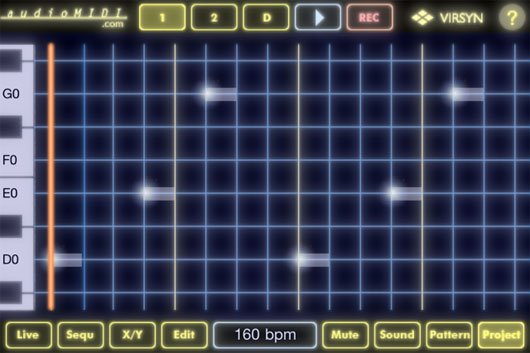
Now, begin to build your beat. As soon as you launch iSyn, you will be presented with a two-octave keyboard set in a monochrome-style screen graphic. The colors consist of mainly yellow on a black background with blue, red, or green taking over, depending on the track or channel you are in.
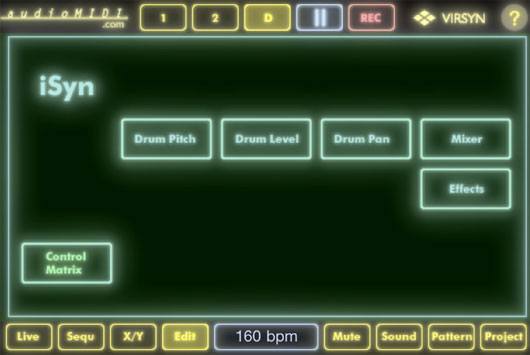
The app consists of three tracks for you to work within:
1 = synth 1 (blue)
2 = synth 2 (red)
D = drum (green)
Initially, I thought three tracks could be limiting, but, as is usually the way when dealing with the creative interface on a piece of musical equipment, the limitations are where the real juices can start to flow. iSyn has this vibe in abundance!
You can start with any of the three tracks, but I think the drum track is usually a good place to begin. At the top of the screen you will see the aforementioned tracks represented as three small rectangular buttons, near which you will find a play button in white and the record bottom in red, of course. Hit the button marked ‘D.’ There you will find eight green circular drum pads. Now hit the button marked ‘Sequ’ at the bottom left of the screen next to the live button, and you will be presented with a grid (step editor) in green-on-black graphics. On the left side of the grid are the initials of eight drum sounds for you to sequence your beat with:
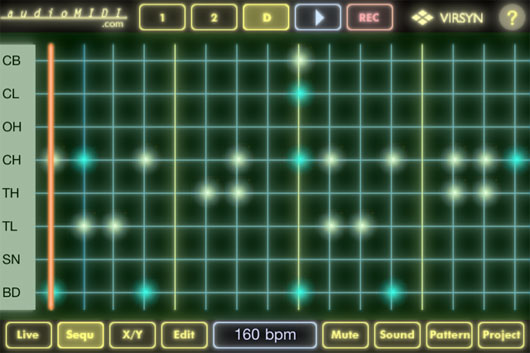
CB = cowbell
CL = clap
OH = open hi-hat
CH = closed hi-hat
TH = tom-hi
TL = tom-low
SN = snare
BD = bass drum
iSyn has eight kits to choose from, and you will find them all in the button marked ‘Sound,’ which is at the bottom right of the screen between the ‘Mute’ and ‘Pattern’ buttons. To start making a beat, touch anywhere on the grid where the horizontal and vertical lines meet. You will see those points light up as white dots. Now, press the white play button at the top of the screen and you will be able to hear the results as the orange playhead line travels from left to right across the grid/timeline. By now you should have a beat.
If you want to add accents to certain parts of your beat, touch and hold down the parts (that are already activated) for longer than usual, and you will notice the activated dots turn from white to green. You may notice your beat jumping out at you a little bit more, and the feel and swing might have more of a vibe, too—all subjective stuff, of course, but hopefully you will start to hear a vibe that may be to your liking.
Once you are happy with your beat, I would advise that you save it straight away. The buttons on these devices are small and can be quite fiddly, unless you are working on an iPad. If, say, you touch the wrong button—like a different song in the project section (lower right of the screen)—then if try to go back to your new beat or song, all that is not saved will be lost. To save your new beat, press the project button. You will see 32 little buttons in a grid. Press and hold one of those buttons and you will be presented with a simple drop down menu:
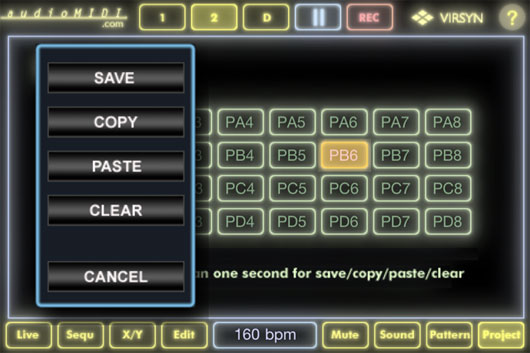
Hold the save button until it flashes. Your beat is now saved as a song in project mode. There is no way of naming your project/songs within iSyn, but after a while you will start to remember which ideas correspond to a certain number.
Now that the first part of your song (the beat) is saved, you can move to Syn1 or 2 to begin adding a bassline or a melody part. As with the drum section, you will be presented with a step sequencer grid. Only this time, in place of the vertical drum initials on the left of the screen, you will find the keys of a piano instead. Said keys will have the appropriate musical notes displayed on them. This makes it easier to keep track of your notes, seeing as the vertical keyboard can be moved up or down so that you have access to quite a few octaves.
Both Syn1 and 2 are monophonic, which is fine for bass but can be limiting if you have ideas that consist of chords. This is where the creative juices can come into play, as was the case of the track “93 Million Miles.” I had these chord ideas running through my head as soon as I had finished the drums and bass. But obviously there was no way I would be able to add the chord ideas at this stage in the process, due to the limitations mentioned above. So, instead, I planned to add them later on, once I had transferred the idea into Logic. Regardless, I wanted to put something in that would fill the space there and then.
The way I interpreted the chordal ideas featured in “93 Million Miles” into the sequence using the monophonic synth was by breaking down the chords into their basic note structure and converting them into a scale or arpeggio. Ask me which particular scale and I wouldn’t be able to tell you, but I can usually hear all the notes present within a chord. Now you can have a ton of fun adding rhythmical characteristics to your original chord idea via the note grid or step sequencer. Arpeggiators are a really great way of injecting the groove of your rhythm section into the musical parts of a track. The possibilities are endless!
Once you have your three main elements cooking—drum, bass, melody (arpeggio)—then the real fun can begin! Being the iPhone/iPod, you have access to functions within iSyn that utilize the accelerometer and three-axis gyro capabilities of the device. To give you an example: press the D button at the top of the screen that is the drum section. Now, that you are in Drum mode, go down to the bottom of the screen and press the Edit button. This is next to a little white button/window displaying the current bpm. Once you are in the edit section, things can start to look a bit confusing, but believe me when I say that with familiarity it will all become a breeze to use. Once in edit mode, you will be presented with six slightly larger rectangular buttons:
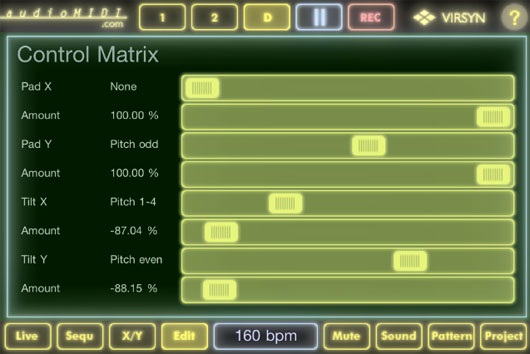
Now, press Control Matrix at the bottom left corner of the screen. You will be presented with eight horizontal sliders with their appropriate descriptions to the left of the screen. These descriptions consist of two columns: the left gives you a combination of the parameter to be tweaked and the right gives you the amount, value, or nature of your tweaks. Go down until you see the slider, which is second from the bottom of the screen. To the far left of that slider it should say Tilt Y. Move the slider along until you see Pitch Even in the right (value) column, and let the fun and games begin!
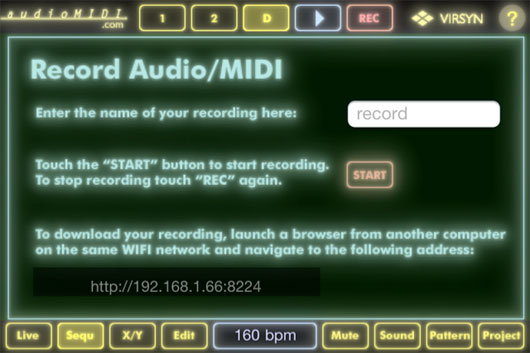
If your sequence isn’t already playing, press the play button and start to move your phone/pod around in a random three-dimensional trajectory. You will notice that certain aspects of your drum track will start to change in pitch. Also, you will notice certain aspects of your two synth sounds will start to warp, resonate, filter, or even mute depending on the position of your device. This opens up a whole new world of live-track performance mixing. Plus, if you go to the Record section (the only spot where you can name your work), you can do a live rendering of your sequence/song and all the movements you make while you are in record mode. The results can be very impressive and you will soon come to realize that if you were to try to obtain these same results—say, using your usual tools for production and beat making—it would take you a very long time. Plus you would miss out on the whole live fluid vibe that iSyn can generate in spades.
Once you have finished your recording, at the bottom of the record page you will find a URL or web address. Make sure you have another computer near by on the same WiFi network. Launch your browser on this computer and go to the URL. There you will find your recording along with a list of any others you might have done before, plus MIDI files to go with them. You can now save these files as Quicktimes your computer. Enjoy!